I can't believe its been nearly a month since I last updated this blog! What with family holidays and one thing or another time to write anything down as been as scarce as rocking horse droppings!
However some advantage of the recent warm dry weather has given me chance to work outside wood butchering and painting on my current project "Steam on the Cambrian"
With it's first exhibition booked for September 28th this year and a date for a magazine photo shoot already arranged I had better get my finger out!
So, what has been done over the last few weeks?
The basic layout is done, almost ready to go on show but was missing one fiddle yard and a lighting rig.
The lighting rig idea I picked up from a few other modellers who have used a similar idea, I have made a "hood" for each of the modules that folds down when the layout is in store or transit and raises to an angle of 45 degrees when the the layout is erected. The picture below shows better than I can explain.
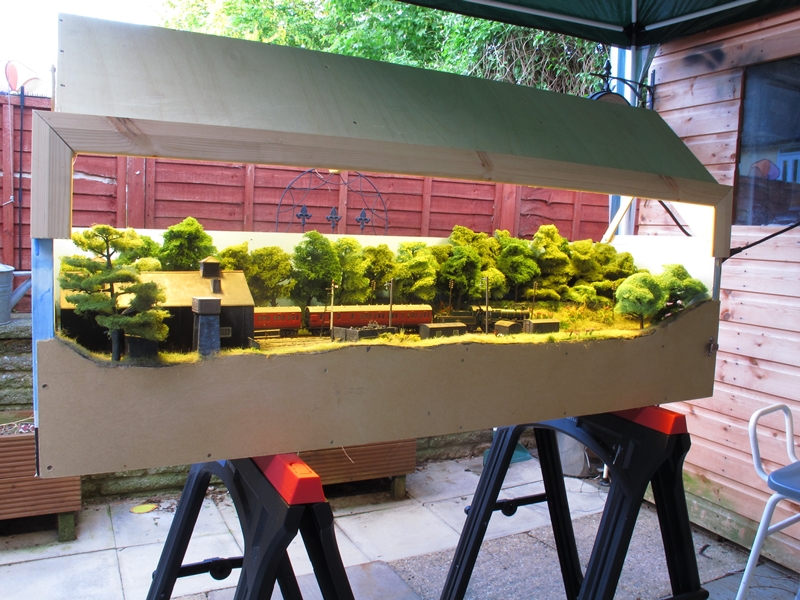
Inside the "hood" are 3 x 15 Watt energy saving light bulbs which i hope will give a sufficient light level. I am going to try various lamps to see which ones give the best colour render and will report back on this.
Moving on!
The "down" fiddle yard has also been built, and some improvements made to the "up" fiddle yard. Both fiddle yards being built to the same design.
One thing that was missing on my previous blog entry "On the fiddle" was some way of preventing locos and stock from over shooting the turntable or dropping off the turntable as it was being rotated.
I came up with this idea using a strip of alloy bent into a large U shape.Heat shrink tube was used to prevent the barrier shorting on the tracks if lowered too far.
With the barrier lowered stock is prevented from rolling off the table.
Once in position the barrier is raised to allow entry/ exit of trains.
The turntable itself is just long enough to accommodate a tender loco and two coaches,or loco and 5 wagons which is all I need for operation of "Steam on the Cambrian"
If I wanted to run a section of the CCE though i will have to have a rethink!
So folks as you can see I have been doing something even if my blog has been quiet!
More updates or stories soon!
Cheers!
Frank
Monday, 29 July 2013
Saturday, 1 June 2013
Starting to get "Brassed off"
My recent new found fetish for narrow gauge steam in 7mm scale has taken a slight change of direction recently. Up to now most of the loco and rolling stock bodies I have scratch built have used plastic card and sections for their construction, mainly because plasticard is easy to cut to shape and easy to glue together without adding in the cost factor.
However I thought I would experiment a bit on the latest model to hit the table and use some brass sheet and other bits instead of the usual plasticard.
I have built 0 gauge brass kits before many years ago so working in thi scale should be no different.
The loco on my bench now is this 0-4-0ST which started life as an Hornby Caledonian Pug bought from Ebay for a fiver.
All that's really left of it is the diecast footplate and part of the plastic chassis. I have changed the motor, fitted 40:1 gears, Romford wheels and axles. The other part left from the original is the smoke box and saddle tank. Every thing else is made by my big fists!
The pictures show the brass tender body (unfinished) and the cab front and sides.
It represents no particular prototype but having a tender it will end up looking like a cross breed between a Hunslett and an England engine.
I am unsure what to do about the tender, do I make a tank and model it as being oil fired or do I just fill it with coal? decision time soon!
More later thanks for reading.
Frank
Subscribe to:
Posts (Atom)